CVT Cooler Overview
The CVT oil warmer/cooler has two closed loops to exchange heat between the CVT and the engine. After starting the vehicle, the engine helps warm the CVT fluid to operating temperature. During extended operation, the exchange provides a cooling effect as heat from the CVT is exchanged into the engine coolant.
To prevent the CVT from overheating, inspect the engine coolant and replace the engine coolant if it is degraded. Per the Nissan service manual engine coolant must be replaced at 105,000 miles or 84 months, whichever comes earlier. Make sure the engine coolant lines are not obstructed and coolant can freely flow into the CVT warmer/cooler. It is also important to inspect the engine air filter and replace it if dirty or obstructed. Excess engine temperature will overheat the CVT fluid and may cause premature failure.
CVT Warmer/Cooler Flushing
Whenever an automatic transaxle is repaired, overhauled, or replaced, the CVT fluid cooler mounted in the radiator must be inspected and cleaned.
Metal debris and friction material, if present, can be trapped or become deposit in the CVT fluid cooler. This debris can contaminate the newly serviced CVT or, in severe cases, can block or restrict the flow of CVT fluid. In either case, malfunction of the newly serviced CVT may occur.
Debris, if present, may deposit as CVT fluid enters the cooler inlet. It will be necessary to back flush the cooler through the cooler outlet in order to flush out any built up debris.
CVT FLUID COOLER CLEANING PROCEDURE
- Position an oil pan under the transaxle’s inlet and outlet cooler hoses.
- Identify the inlet and outlet fluid cooler hoses.
- Disconnect the fluid cooler inlet and outlet rubber hoses from the steel cooler tubes or bypass valve.
- Allow any CVT fluid that remains in the cooler hoses to drain into the oil pan.
- Insert the extension adapter hose of a can of Transmission Cooler Cleaner (Nissan P/N 999MP-AM006) into the cooler outlet hose.
- Hold the hose and can as high as possible and spray Transmission Cooler Cleaner in a continuous stream into the cooler outlet hose until CVT fluid flows out of the cooler inlet hose for 5 seconds.
- Insert the tip of an air gun into the end of the cooler outlet ho
- Wrap a shop rag around the air gun tip and end of the cooler outlet hose.
- Blow compressed air regulated to 5 to 9 kg/cm2 (70 to 130 psi) through the cooler outlet hose for 10 seconds to force out any remaining CVT fluid.
- Repeat steps 5 through 9 three additional times.
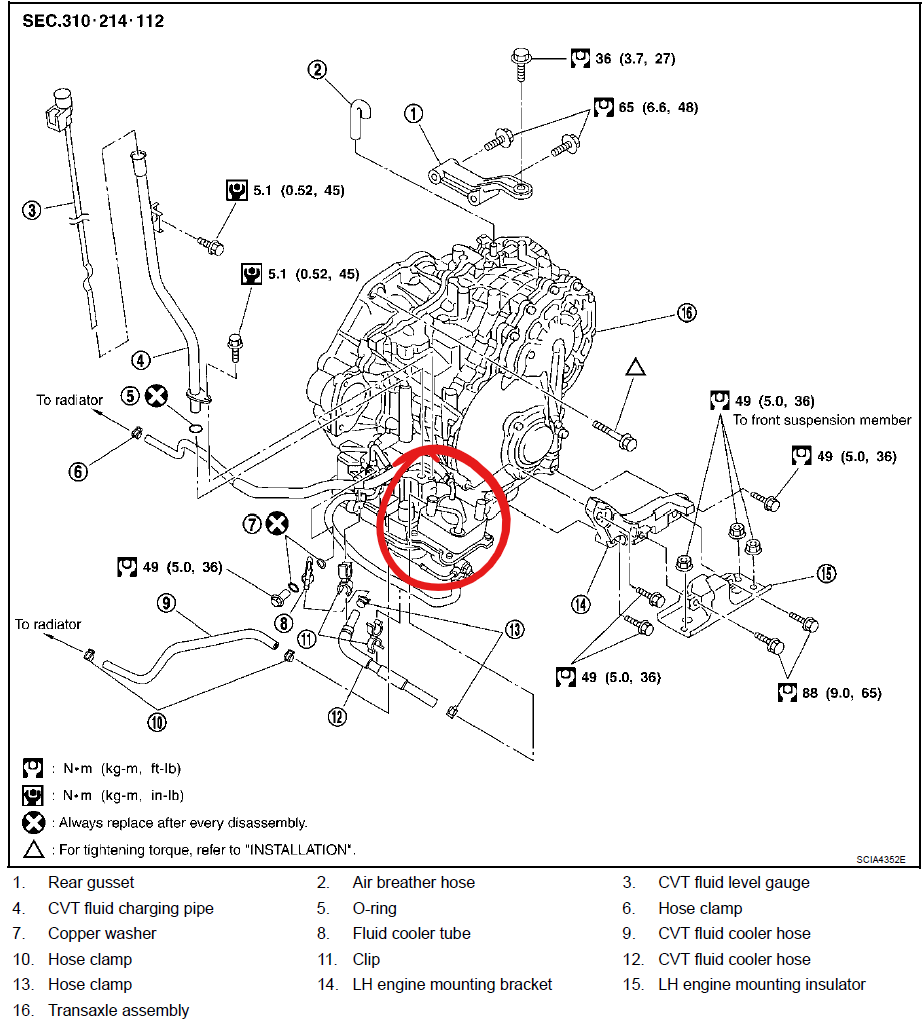
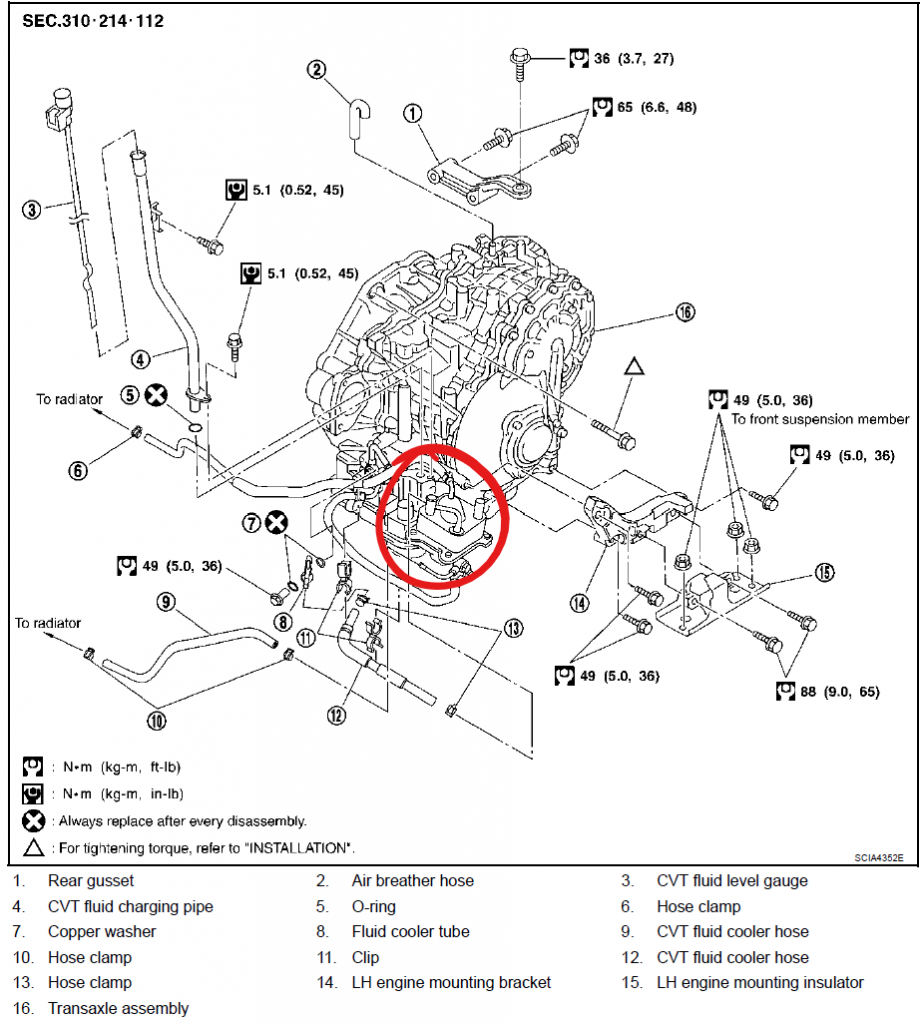
- Position an oil pan under the banjo bolts that connect the CVT fluid cooler steel lines to the transaxle.
- Remove the banjo bolts.
- Flush each steel line from the cooler side back toward the transaxle by spraying Transmission Cooler Cleaner in a continuous stream for 5 seconds.
- Blow compressed air regulated to 5 to 9 kg/cm2 (70 to 130 psi) through each steel line from the cooler side back toward the transaxle for 10 seconds to force out any remaining CVT fluid.
- Ensure all debris is removed from the steel cooler lines.
- Ensure all debris is removed from the banjo bolts and fittings.
CVT FLUID
- Approximate capacity is 10.2 liters (10 ¼ quarts)
- Berkeley Standard’s reman CVT will already contain approx 3 quarts from the testing machine
- Use only Nissan NS-2 or NS-2 rated CVT fluid
- Use the CVT fluid dipstick to determine the correct fluid level
- Fill CVT fluid from CVT fluid charging pipe to the specified level on the CVT fluid dipstick.
- Adjust CVT fluid level temperature is 50° to 80°C (122° to 176°F). The vehicle needs to warm up for approximately 10 minutes of idle or light driving
- If fluid level is too high, drain the excess fluid from the drain plug on the oil pan
- The CVT fluid should be inspected every 30,000 miles and replaced if burnt, contaminated, or otherwise degraded. Replace CVT fluid with NS-2 rated fluid only.
- NOTE: The fluid change interval for the JF010E CVT is every 60,000 miles. If the vehicle has been driven over 60,000 miles on a Berkeley Standard CVT, maintenance records showing proof of fluid change(s) at 60,000 mile or earlier intervals must be provided in order to ensure warranty coverage.
NOTE: Nissan NS-3 is NOT interchangable with NS-2. The use of the incorrect fluid will lead to premature wear and overheating of the CVT and will invalidate the warranty coverage.
Filling CVT Fluid
1. Warm up CVT fluid by letting the engine run approx 10 minutes.
- Refill with new CVT fluid at CVT fluid charging pipe with the engine running at idle speed.
- Refill until new CVT fluid at the proper level according to the CVT filler tube dipstick
CAUTION: Use genuine NISSAN CVT fluid NS-2.
- Delete CVT fluid deterioration date with scan tool after changing CVT fluid.
- Check fluid level and condition.
TCM Initialization Procedure
- Set the parking brake with the selector lever in “P” (Park).
- Connect scan tool to the vehicle and turn the ignition ON (engine OFF – not running).
- Navigate the scan tool to find the TCM Part number
- Select the TCM part number (P/N) and Calibration Data, and then print and save a copy.
- Perform the initialization (EEPROM erase) procedure as follows:
- Select Transmission Self Diagnostic Results.
- Press and hold the brake pedal.
- Shift the selector lever to “R” (Reverse).
- Press and hold the accelerator pedal down about one-third, but no more than halfway.
- The purpose of this step is to get both the wide open throttle and closed throttle position signals to read “OFF” at the same time.
- Press Erase.
IMPORTANT: During the next step, observe the shift selector position display.
- Shift the selector lever to “P” (Park).
- If there is a delay with “P” to illuminate, EEPROM has successfully erased.
- If there is no delay, EEPROM has not erased. Perform Step 5 again.
TCM Reprogramming
The vehicle does not require programming unless the TCM software is affected by a service bulletin. To check the TCM software see instructions below:
First, find TCM Part Number with Scan Tool. The TCM hardware is a computer chip with identical hardware and the part number represents the software the TCM is programmed with. The TCM part number will start with 31036-XXXX.
If the TCM part number is any of the ones on the table below, the TCM is affected by a service bulletin needs to be reprogrammed with updated software. This can be done either with a Consult 3+ scanner and programmer (available at Nissan dealerships), or with the RAP Kit by Drew Technologies.
NOTE: The JF010E transmission or valve body does not come with a programming CD.
NOTE: If there are any diagnostic trouble codes (DTC) the transmission may not program. Clear all DTCs before proceeding with programming. If there are persistent DTCs, these must be addressed and cleared before programming can proceed.
CURRENT TCM PART NUMBER 31036 – XXXXX
| 2009 Murano | 1AA0A | 2009 Maxima | 9N00C |
| 2009 Murano | 1AA0B | 2009 Maxima | 9N00D |
| 2009 Murano | 1AA0C | 2009 Maxima | 9N00E |
| 2009 Murano | 1AA0D | 2009 Maxima | 9N01A |
| 2009 Murano | 1AA0E | 2009 Maxima | 9N01B |
| 2009 Murano | 1AA1A | 2009 Maxima | 9N01C |
| 2009 Murano | 1AA1B | 2009 Maxima | 9N09A |
| 2009 Murano | 1AA1C | 2010 Maxima | 9N00C |
| 2009 Murano | 1AA9A | 2010 Maxima | 9N00D |
| 2009 Murano | 1AD0A | 2010 Maxima | 9N00E |
| 2009 Murano | 1AD0B | 2010 Maxima | 9N01A |
| 2009 Murano | 1AD0C | 2010 Maxima | 9N01B |
| 2009 Murano | 1AD0D | 2010 Maxima | 9N09A |
| 2009 Murano | 1AD0E | ||
| 2009 Murano | 1AD1A | ||
| 2009 Murano | 1AD1B | ||
| 2009 Murano | 1AD1C | ||
| 2009 Murano | 1AD9A | ||
| 2010 Murano | 1AA0A | ||
| 2010 Murano | 1AA0B | ||
| 2010 Murano | 1AA0C | ||
| 2010 Murano | 1AA0D | ||
| 2010 Murano | 1AA0E | ||
| 2010 Murano | 1AA9A | ||
| 2010 Murano | 1AA1A | ||
| 2010 Murano | 1AA1B | ||
| 2010 Murano | 1AA1C |
TEST DRIVE AND TRANSMISSION CALIBRATION
After the transmission has been installed use a scan tool to verify the vehicle does not have any diagnostic trouble codes. If there are codes from the previous transmission, clear them with a scan tool and check if they return. When the vehicle does not have any codes, clear the TCM memory, self-learning data, and fluid degradation data. Test drive the vehicle for an additional 15 – 20 minutes to allow the TCM to self-calibrate. Do not test drive the vehicle if it has any DTCs.
The test drive should cover a range of speeds in both forward and reverse. The vehicle may shift abnormally at the beginning of the test drive but should normalize in 20 minutes or less. If the MIL / check engine light illuminates during the test drive, do not continue driving.
Re-scan the vehicle after the test drive to ensure there are no DTCs.
Source material: Nissan CVT manuals and TSBs
Leave a Reply