JF016E and JF017E Instructions – PROGRAMMING REQUIRED
Pre-installation inspection
Before the transmission is installed check to make sure the JATCO stamp code on the top of the transmission matches the core. Inspect the transmission for any differences between the core, as well as for any signs of damage or leaking fluid. If the transmission is different from the core or shows any signs of leaks or visible damage, do not install it.
NOTE: The transmission does not ship with a range sensor (PNP switch). It is acceptable to reuse the range sensor from the core if it is undamaged.
CVT Warmer/Cooler Flushing
Metal debris and friction material may become trapped in the radiator, cooling hoses, bypass valve or external CVT fluid cooler. This debris can contaminate the newly serviced transmission, control valve or torque converter. In severe cases this debris can block or restrict flow and may cause damage to the newly serviced CVT. When a CVT, control valve, or torque converter is replaced, the CVT transmission fluid cooler must be flushed.
The CVT oil warmer/cooler has two closed loops to exchange heat between the CVT and the engine. After starting the vehicle, the engine helps warm the CVT fluid to operating temperature. During extended operation, the exchange provides a cooling effect as heat from the CVT is exchanged into the engine coolant.
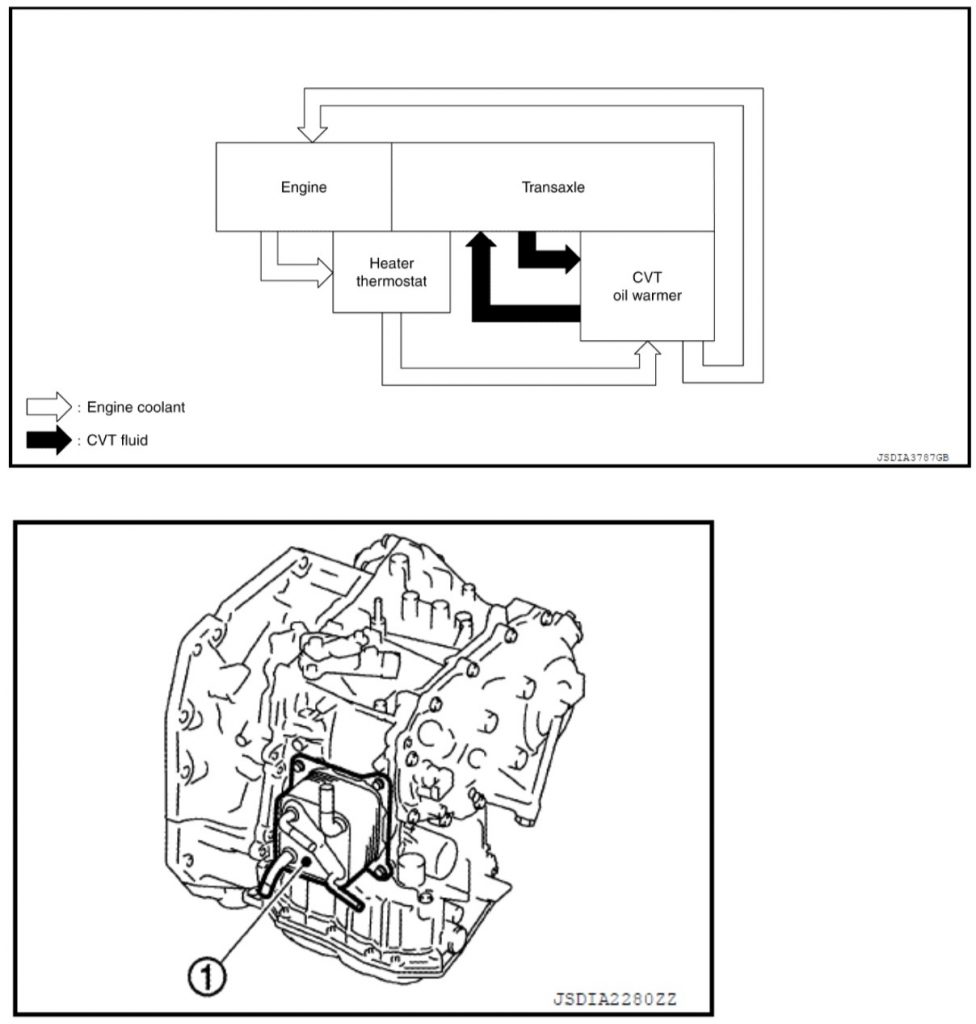
To prevent the CVT from overheating, inspect the engine coolant and replace the engine coolant if it is degraded. Per the Nissan service manual engine coolant must be replaced at 105,000 miles or 84 months, whichever comes earlier. Make sure the engine coolant lines are not obstructed and coolant can freely flow into the CVT warmer/cooler. It is also important to inspect the engine air filter and replace it if dirty or obstructed. Excess engine temperature will overheat the CVT fluid and may cause premature failure.
The CVT fluid should also be inspected every 30,000 miles and replaced if burnt, contaminated, or otherwise degraded. Replace CVT fluid with NS-3 rated fluid only.
Flushing Radiator based CVT Transmission Fluid Cooler
IMPORTANT: the CVT fluid cooler hoses will be flushed in both directions in the following procedure.
- Place the vehicle on a lift.
- Place an oil drain pan under the CVT Warmer.
- Disconnect the CVT fluid cooler inlet and outlet rubber hoses from the CVT Fluid warmer and discard spring clamps.
NOTE: If rubber material from a cooler hose remains on the steel tube or fitting, replace the rubber hose and clean steel tube. - Allow any transmission fluid that remains in the CVT fluid cooler hoses to drain into the oil drain pan. NOTE: The two hoses that have been removed from the CVT fluid warmer will be flushed first in one direction and then the other.
CAUTION: Wear safety glasses and rubber gloves when spraying the Transmission Cooler Cleaner. Spray Cooler Cleaner only in areas with adequate ventilation. Avoid contact with eyes and skin. Do not breathe vapors or mist from spray.
- Insert the “extension adapter hose”, from a can of Transmission Cooler Cleaner (Nissan P/N 999MP-AM006P), into one or the other of the disconnected CVT fluid cooler hoses
- Flush CVT fluid cooler (radiator based) and hoses:
- Hold the hose and can as high as possible.
- Spray Transmission Cooler Cleaner, in a continuous stream, into the CVT fluid cooler inlet hose.
- Spray fluid until it flows out of the other hose for 5 seconds.
- Slide a piece of 5/8 inch hose (16 mm) over the end of the CVT fluid cooler hose that was used as the flush inlet.
- Insert the tip of an air gun into the end of 5/8 inch (16 mm) hose.
- Blow compressed air, regulated to 5-9 kg/cm2 (70 – 130 PSI), through the CVT fluid cooler hose for 10 seconds to force out any remaining fluid.
- Repeat steps 5 through 9 one additional time and then proceed to step 11.
- Now reverse the direction that the hoses are being flushed and repeat steps 5 through 9 twice. When completed proceed to step 12.
- Reassemble the CVT fluid cooler hoses to the CVT warmer with new spring clamps in the reverse order of disassembly.
CVT Fluid Type and Fill Level
NOTE: The fluid change interval for the JF016E CVT is every 30,000 (heavy use)- 60,000 miles. Nissan NS-3 rated fluid should be used. The use of the incorrect fluid will lead to premature wear and overheating of the CVT and will invalidate the warranty coverage.
After the CVT has been installed in the vehicle, the CVT should be filled with fluid from the drain plug at the side of case by the bell housing. The volume of the CVT fluid is dependent on temperature, and when filling or adjusting CVT fluid level, the fluid temperature should be 35C – 45C (95 to 113°F).
CVT Fluid Fill Instructions
- Engage the parking brake and lift up the vehicle.
- Check that there is no CVT fluid leakage.
- Remove the drain plug from the CVT oil pan.
- After fluid has drained, reinstall drain plug.
- Remove the overflow plug from the converter housing
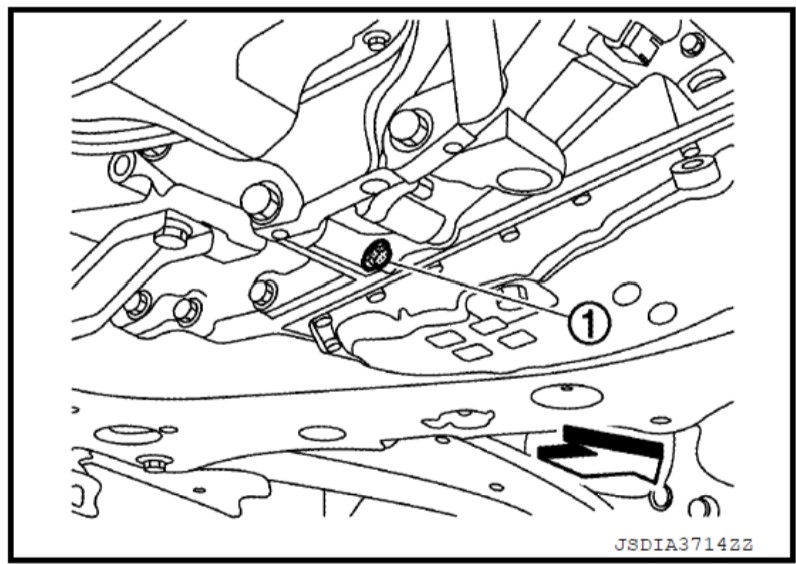
- Install the charging pipe set (KV311039S0) (A) into the overflow hole.
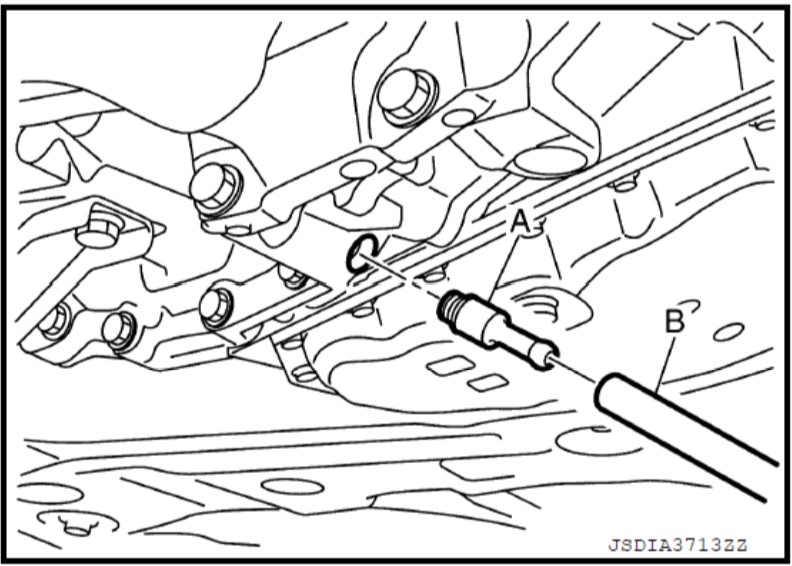
- Tighten the charging pipe by hand.
- Install the ATF changer hose to the charging pipe. Press the ATF changer hose all the way onto the charging pipe until it stops.
- Fill approximately 3 liters (3.2 US qt) of NS-3 CVT fluid.
- Remove the ATF changing hose and changing pipe, then install the overflow plug.
- Lift down the vehicle.
- Start the engine.
- While depressing the brake pedal, shift the selector lever to the entire position from “P” to “DS”, and shift it to the “P” position. Hold the lever at each position for 5 seconds.
- Check the scan tool to ensure the fluid temperature is 35°C (95°F) to 45°C (113°F).
- Lift up the vehicle.
- Remove the drain plug and then drain CVT fluid from the oil pan.
- Repeat steps 6-16 one time
- Tighten the drain plug to the specified torque
- Remove the overflow plug
- Install the changing pipe set into the overflow plug hold. Tighten the changing pipe by hand.
- Install ATF changer hose and charging pipe, then install the overflow plug. Perform this quickly because the CVT fluid will leak.
- Lift down the vehicle and start the engine.
- While depressing the brake pedal, shift the selector lever to the entire position from “P” to “DS”, and shift it to the “P” position. Hold the lever at each position for 5 seconds.
- Check the scan tool to ensure the fluid temperature is 35°C (95°F) to 45°C (113°F).
- Remove the overflow plug and confirm the CVT fluid is drained from the overflow plug hole. Perform this while the vehicle is iding. If the fluid does not drain, adjust the fluid level by adding ½ liter to the throught the overflow hole with the ATF filling tube, or through the oil filler pipe on the top of the transmission.
- When the flow of the CVT fluid from the overflow plug hole slows to a drip, tighten the overflow plug.
- Lift down the vehicle.
- Using a scan tool, reset CVT Fluid Deterioration in the TCM
- Stop the engine.
Alternative Fluid Level Check Procedure
The fluid level of the transmission can be checked though the oil filler pipe with a J-51155 tool or 23 ⅛ dipstick.
- Park the vehicle on level ground (engine running, parking brake set).
- Ensure that the CVT fluid operating temperature is within the range of 170°F-180°F (77°C-82°C).
- Shift the transmission into REVERSE for 5 seconds.
- Shift the transmission into DRIVE for 5 seconds.
- Shift the transmission into REVERSE for 5 seconds.
- Shift the transmission into PARK.
- Remove the plastic cap from the filler tube and insert the J-51155 tool or 23 ⅛ dipstick
- Reference the table below for proper fluid level
| Jf016e Model | Level (mm) | Handle color |
| 2013-2018 Altima (2.5 liter) | 23-30 | Blue |
| 2014-2019 Rogue (VIN starts with 5 or J) | 44-51 | Blue |
| 2015-2019 Rogue (VIN starts with K) | 50-57 | Blue |
| 2017-2019 Rogue Sport | 10-17 | Blue |
| 2017-2019 Sentra Turbo | 10-17 | Blue |
| JF017e Model | Level (mm) | Handle color |
| 2013-2018 Altima (3.5 liter) | 14-22 | Red |
| 2016-2019 Maxima | 14-22 | Red |
| 2015-2019 Murano (non-hybrid) | 14-22 | Red |
| 2015-2017 Quest | 14-22 | Red |
| 2013-2019 Pathfinder (non-hybrid) | 14-22 | Red |
TCM Reprogramming – REQUIRED FOR WARRANTY
Programming is required for JF016E applications due to the high likelihood of judder codes and valve body codes if programming is skipped. We will require proof of programming to honor any warranty involving valve body codes or judder codes.
Although the vehicle can be driven without programming, programming is required for the following reasons:
- Solenoids are calibrated using the CD or calibration code on the range sensor
- The TCM software is updated to the most recent version.
- Programming rules out external (non-mechanical) causes of transmission failure.
- Warranty coverage. See below for required documentation to demonstrate proof of programming.
Programming can be done with a Consult 3+ scanner and programmer (available at Nissan dealerships and with mobile programming services). TCM programming requires a Consult 3+ At the time of writing (2025) the DrewTech RAP Kit is not able to do TCM programming on the JF016E and JF017E CVTs.
Proof of programming should include the VIN, odometer reading, date of programming, the previous TCM part number, and the TCM part number after programming
If you take the vehicle to a dealership for programming you will most likely be asked to provide a calibration CD with the programming file. Berkeley Standard’s reman JF016E and JF017E CVT comes packaged with the CD. Alternatively, the dealership can identify and download the correct programming file using the QR code on the range switch (park-neutral safety switch). If the QR code is missing from the range switch, send a message to contact@berkeleystandard.com with your VIN and a team member will reply to your message with the correct QR code for the vehicle.
NOTE: If there are any diagnostic trouble codes (DTC) the transmission may not program. Clear all DTCs before proceeding with programming. If there are persistent DTCs, these must be addressed and cleared before programming can proceed.
TEST DRIVE AND TRANSMISSION CALIBRATION
After the transmission has been installed use a scan tool to verify the vehicle does not have any diagnostic trouble codes. If there are codes from the previous transmission, clear them with a scan tool and check if they return. If the vehicle does not have any codes, test drive the vehicle for an additional 15 – 20 minutes to allow the TCM to self-calibrate. Do not drive the vehicle if it has any DTCs that cannot be cleared before the test drive.
The test drive should cover a range of speeds in both forward and reverse. The vehicle may shift abnormally at the beginning of the test drive but should normalize in 20 minutes or less. If the MIL / check engine light illuminates during the test drive, do not continue driving. Re-scan the vehicle after the test drive to ensure there are no DTCs.
Source material: Nissan CVT manuals and TSBs
Leave a Reply